Landmarks
Returns coordinates for each part of the body as identified by the AI. QuickPose returns body, face and hand landmarks.
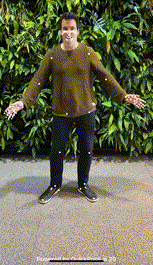
Whilst we use the .showPoints() feature to generate the gif above, this is just to draw the landmarks on the overlay image. Any feature and currently even no feature will return the landmarks.
// no feature will still return landmarks
case showPoints()
case showPoints(style: customStyle) // custom style
case overlay(.head) // custom style
...
As landmarks are instrumental for all our features, you don't need to explicity request them.
Basic Implementation
To see landmarks you'll your view ZStack, which is we assume is setup as described in the Getting Started Guide:
ZStack(alignment: .top) {
    QuickPoseCameraView(useFrontCamera: true, delegate: quickPose)
    QuickPoseOverlayView(overlayImage: $overlayImage)
}
Next we start QuickPose with .showPoints() feature, which draws the landmarks to the overlay.
quickPose.start(features: [.showPoints()], onFrame: { status, image, features, feedback, landmarks in
    switch status {
        case .success:
            overlayImage = image
            if let landmarks = landmarks {
                let bodyNose = landmarks.landmark(forBody: .nose)
                print(bodyNose)
            }
            ...
    }
})
In the code above we request the landmark for the nose using landmarks.landmark(forBody: .nose), and print this to the console:
Point3d(x: 0.5, y: 0.25, cameraAspectY: 0.5, z: -0.0, visibility: 0.9, presence: 0.9)
The Point3d holds the coordinates unscaled, so x and y are between 0 and 1, and the cameraAspectY is the y value scaled to the x axis, which allows more accurate angle math.
 struct Point3d {
    public let x: Double // 0 - 1
    public let y: Double // 0 - 1
    public let cameraAspectY: Double // 0 - maxCameraAspectRatio e.g. 0 - 1.6
    public let z: Double // depth, where the midpoint of hips being the origin
    public let visibility: Double // is the joint in the image and not behind something?
    public let presence: Double // is the joint in the camera image?
 }
We suggest performing your calculations in the unscaled units where possible, as otherwise your logic can become brittle and tried to a specific screen or camera size.
Detailed Coordinates for Face
QuickPose supports detailed landmarks for the face.
quickPose.start(features: [.showPoints()], onFrame: { status, image, features, feedback, landmarks in
    switch status {
        case .success:
            overlayImage = image
            if let landmarks = landmarks {
                if let faceNose = landmarks.landmark(forFace: .faceNose) {
                    print(faceNose)
                }
            }
            ...
    }
})
In the code above we request the landmark for the nose using landmarks.landmark(forFace: .faceNose).
This can be optional as the face landmarks are computed as a secondary more complex step after the pose landmarks.
Then we print the landmark to the log:
Point3d(x: 0.55, y: 0.255, cameraAspectY: 0.55, z: -0.0, visibility: 0.9, presence: 0.9)
Note the results for the general body .nose differ from the more detailed face-specific .faceNose.
For reading all face coordinates we suggest using:
landmarks.allLandmarksForFace()
Detailed Coordinates for Hands
QuickPose supports detailed landmarks for the both hands.
quickPose.start(features: [.showPoints()], onFrame: { status, image, features, feedback, landmarks in
    switch status {
        case .success:
            overlayImage = image
            if let landmarks = landmarks {
                if let leftHand = landmarks.landmark(forLeftHand: .THUMB_TIP) {
                    print(leftHand)
                }
            }
            ...
    }
})
In the code above we request the landmark for the nose using landmarks.landmark(forLeftHand: .THUMB_TIP).
This can be optional as the hand landmarks are computed as a secondary more complex step after the pose landmarks.
Then we print the landmark to the log:
Point3d(x: 0.55, y: 0.255, cameraAspectY: 0.55, z: -0.0, visibility: 0.9, presence: 0.9)
For reading all hand coordinates we suggest using:
landmarks.allLandmarksForHand(side: Side)
Reading coordinates in camera pixels
If you want to see the landmarks coordinates in pixels, use our cgPoint(scaledTo:flippedHorizontally:) function, note if the front camera is used, landmarks.isFrontCamera, the x coordinates are expected to be reversed.
quickPose.start(features: [.showPoints()], onFrame: { status, image, features, feedback, landmarks in
    switch status {
        case .success:
            overlayImage = image
            if let landmarks = landmarks {
                let bodyNose = landmarks.landmark(forBody: .nose)
                print(bodyNose.cgPoint(scaledTo: landmarks.cameraSize, flippedHorizontally: landmarks.isFrontCamera))
            }
            ...
    }
})
This returns a 2D point, scaled to the camera image's.
CGPoint(x: 250, y: 125)
However, this value is only helpful if you keep the full sized camera image.
It might seem obvious to use the camera pixels to draw to the screen, but typically the camera resolution and the view resolution will be different sizes, so any drawn overlays will not accurately overlay onto the camera image.
Reading coordinates in view points
If you want to see the landmarks coordinates in view points, use our cgPoint(scaledTo:flippedHorizontally:) function with the geometry.size value from a GeometryReader view wrapper. If the front camera is used, landmarks.isFrontCamera, the x coordinates are expected to be reversed.
GeometryReader { geometry in
    ZStack(alignment: .top) {
        QuickPoseCameraView(useFrontCamera: true, delegate: quickPose)
        QuickPoseOverlayView(overlayImage: $overlayImage)
    }
}
quickPose.start(features: [.showPoints()], onFrame: { status, image, features, feedback, landmarks in
    switch status {
        case .success:
            overlayImage = image
            if let landmarks = landmarks {
                let bodyNose = landmarks.landmark(forBody: .nose)
                print(bodyNose.cgPoint(scaledTo: geometry.size, flippedHorizontally: landmarks.isFrontCamera))
            }
            ...
    }
})
This returns a 2D point, scaled to the view.
CGPoint(x: 125, y: 60)
Note this is typically smaller than the coordinates returned for the camera pixels.
However, this value is only helpful if you the view is exactly the same aspect ratio as the camera image.
Like above, the camera aspect and the view aspect will likely be different sizes, so any drawn overlays will not accurately overlay onto the camera image. You can mitigate this by restricting the view scaling to maintain the aspect ratio of the camera view.
ZStack(alignment: .top) {
    QuickPoseCameraView(useFrontCamera: true, delegate: quickPose, videoGravity: .resizeAspect)
    QuickPoseOverlayView(overlayImage: $overlayImage, contentMode: .fit)
}
Using World Coordinates
World landmarks are real-world 3D coordinates in meters with the origin at the center between hips.
This allows measurements to be taken consistently over time, using different devices and physical conditions.
quickPose.start(features: [.showPoints()], onFrame: { status, image, features, feedback, landmarks in
    switch status {
        case .success:
            overlayImage = image
            if let landmarks = landmarks {
                let bodyNose = landmarks.worldLandmark(forBody: .nose)
                print(bodyNose)
            }
            ...
    }
})
Then we print the landmark to the log:
Point3d(x: 0.01, y: -0.5, cameraAspectY: -0.96, z: -0.15, visibility: 0.9, presence: 0.9)