Integrate into your iOS app
Register an SDK Key
Get your free SDK key on https://dev.quickpose.ai, usage limits may apply. SDK Keys are linked to your bundle ID, please check Key before distributing to the App Store.
Installing the SDK
Swift Package Manager
Step 1: Click on Xcode project file
Step 2: Click on Swift Packages and click on the plus to add a package
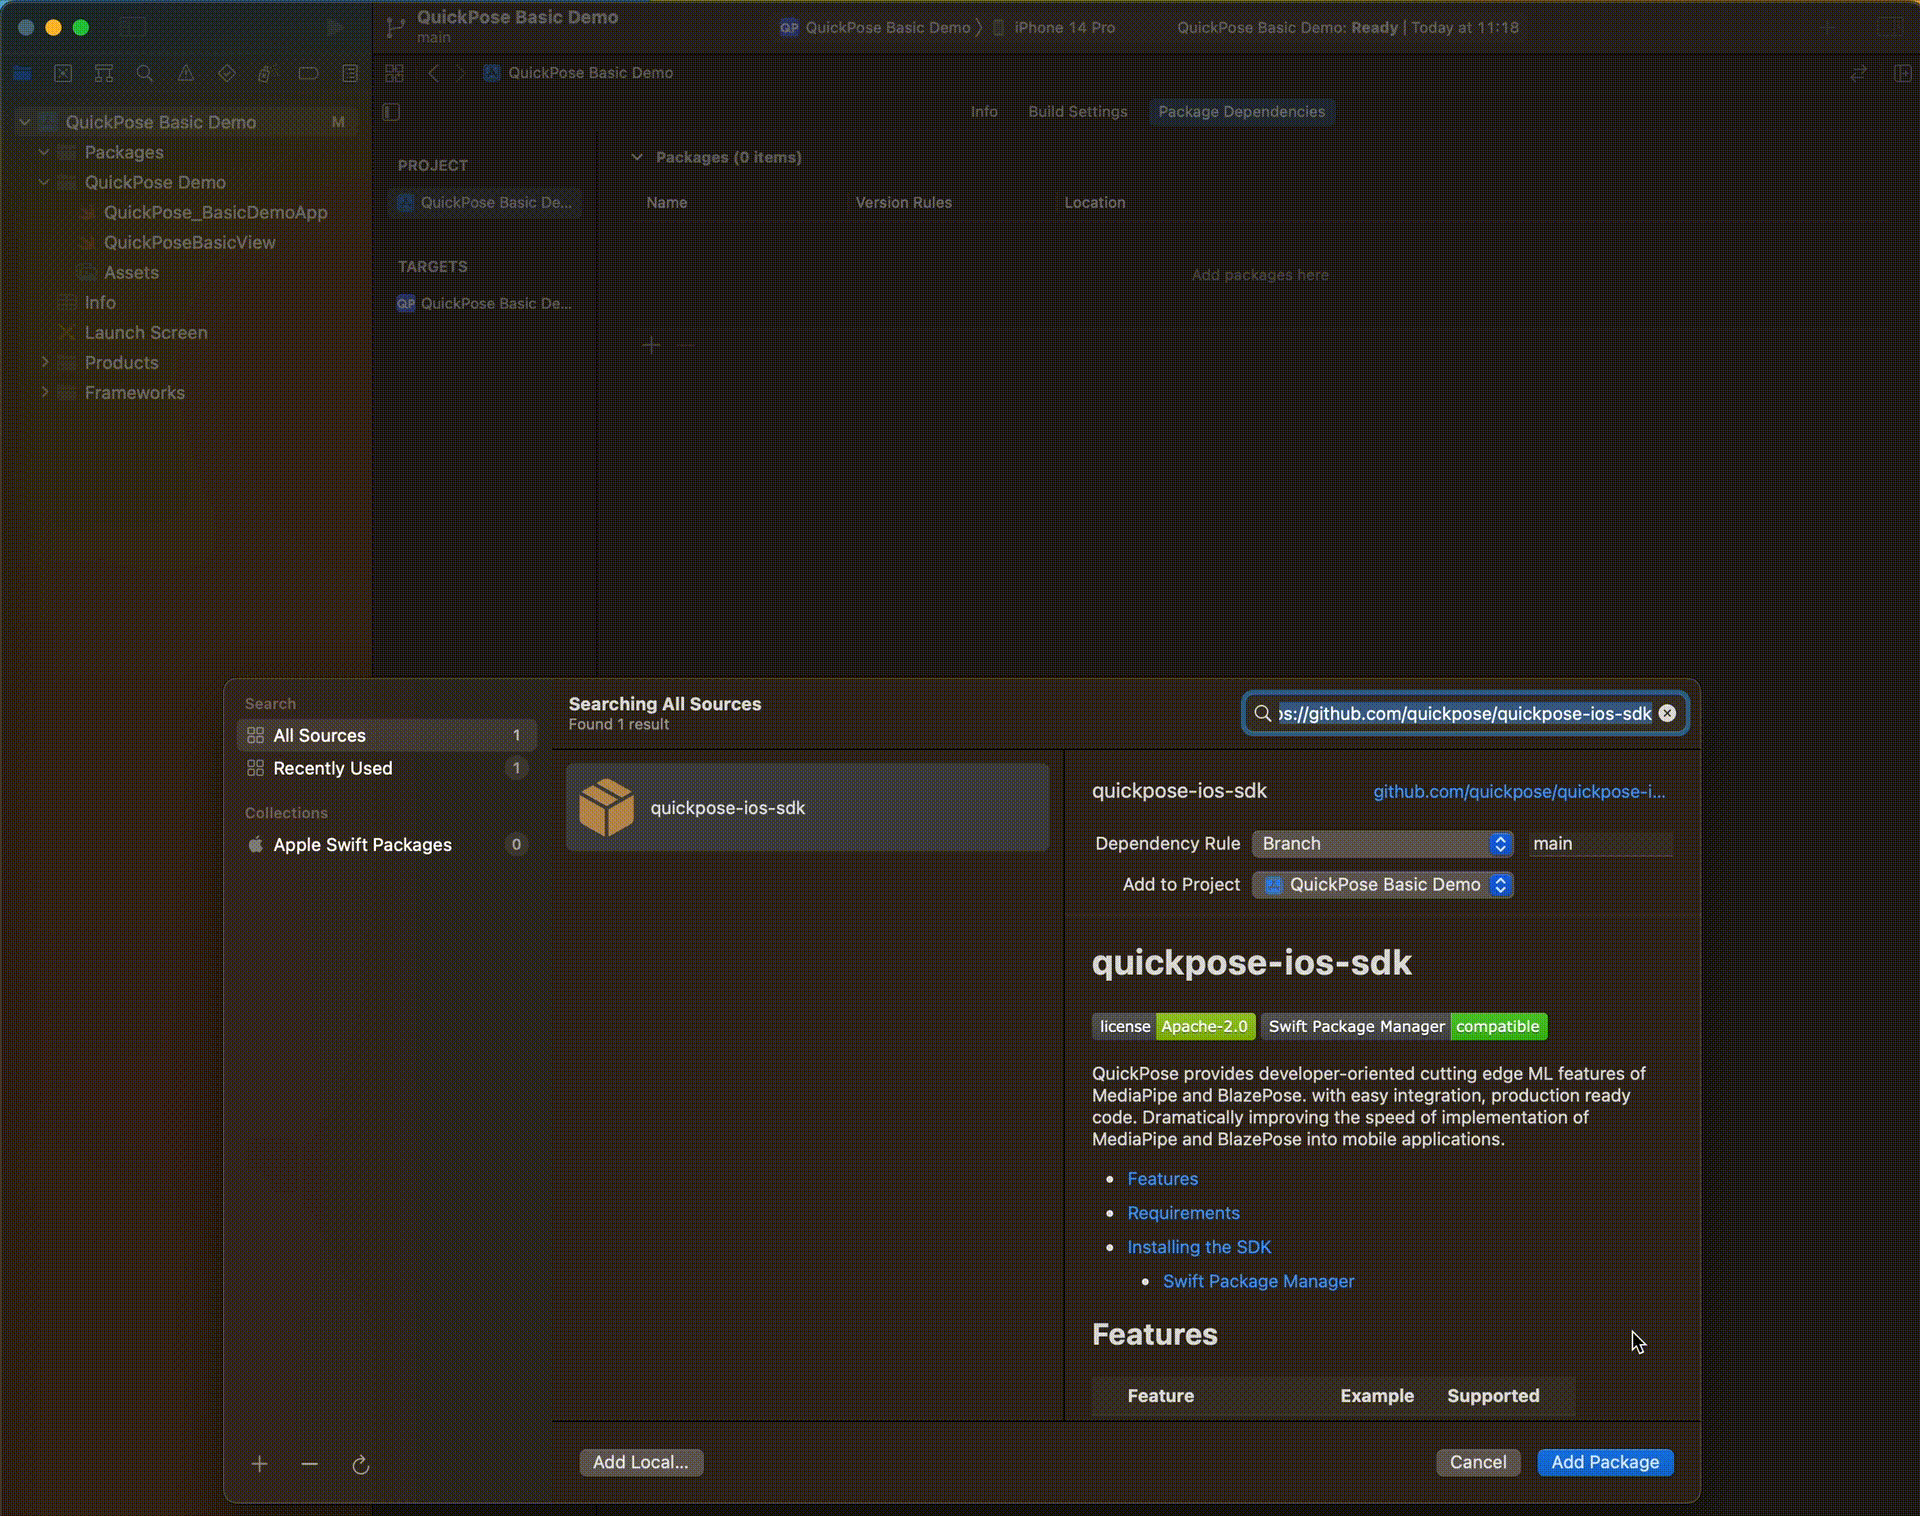
Step 3: Enter the following repository url https://github.com/quickpose/quickpose-ios-sdk.git and click next

Step 4: Choose all modules and click add package.
| Module | Description |
|---|---|
| QuickPoseCore | Core SDK (required) |
| QuickPoseMP | Mediapipe Library with all models (one QuickPoseMP variant is required) |
| QuickPoseMP-lite | Mediapipe Lite Library |
| QuickPoseMP-full | Mediapipe Full Library |
| QuickPoseMP-heavy | Mediapipe Heavy Library |
| QuickPoseCamera | Utility Class for Integration (optional, recommended) |
| QuickPoseSwiftUI | Utility Classes for SwiftUI Integration (optional, recommended) |
CocoaPods
Step 1: Open your project's Podfile
Step 2: Add your pod file dependencies:
pod 'QuickPoseCore', :git => 'https://github.com/quickpose/quickpose-ios-sdk.git'
pod 'QuickPoseCamera', :git => 'https://github.com/quickpose/quickpose-ios-sdk.git'
pod 'QuickPoseSwiftUI', :git => 'https://github.com/quickpose/quickpose-ios-sdk.git'
| Module | Description |
|---|---|
| QuickPoseCore | Includes Core SDK and Mediapipe Library (required) |
| QuickPoseCamera | Utility Class for Integration (optional, recommended) |
| QuickPoseSwiftUI | Utility Classes for SwiftUI Integration (optional, recommended) |
Step 3: Run pod update from the command line
Add Camera Permission
Apple requires app's using the camera to provide a reason when prompting the user, and will not allow camera access without this set.
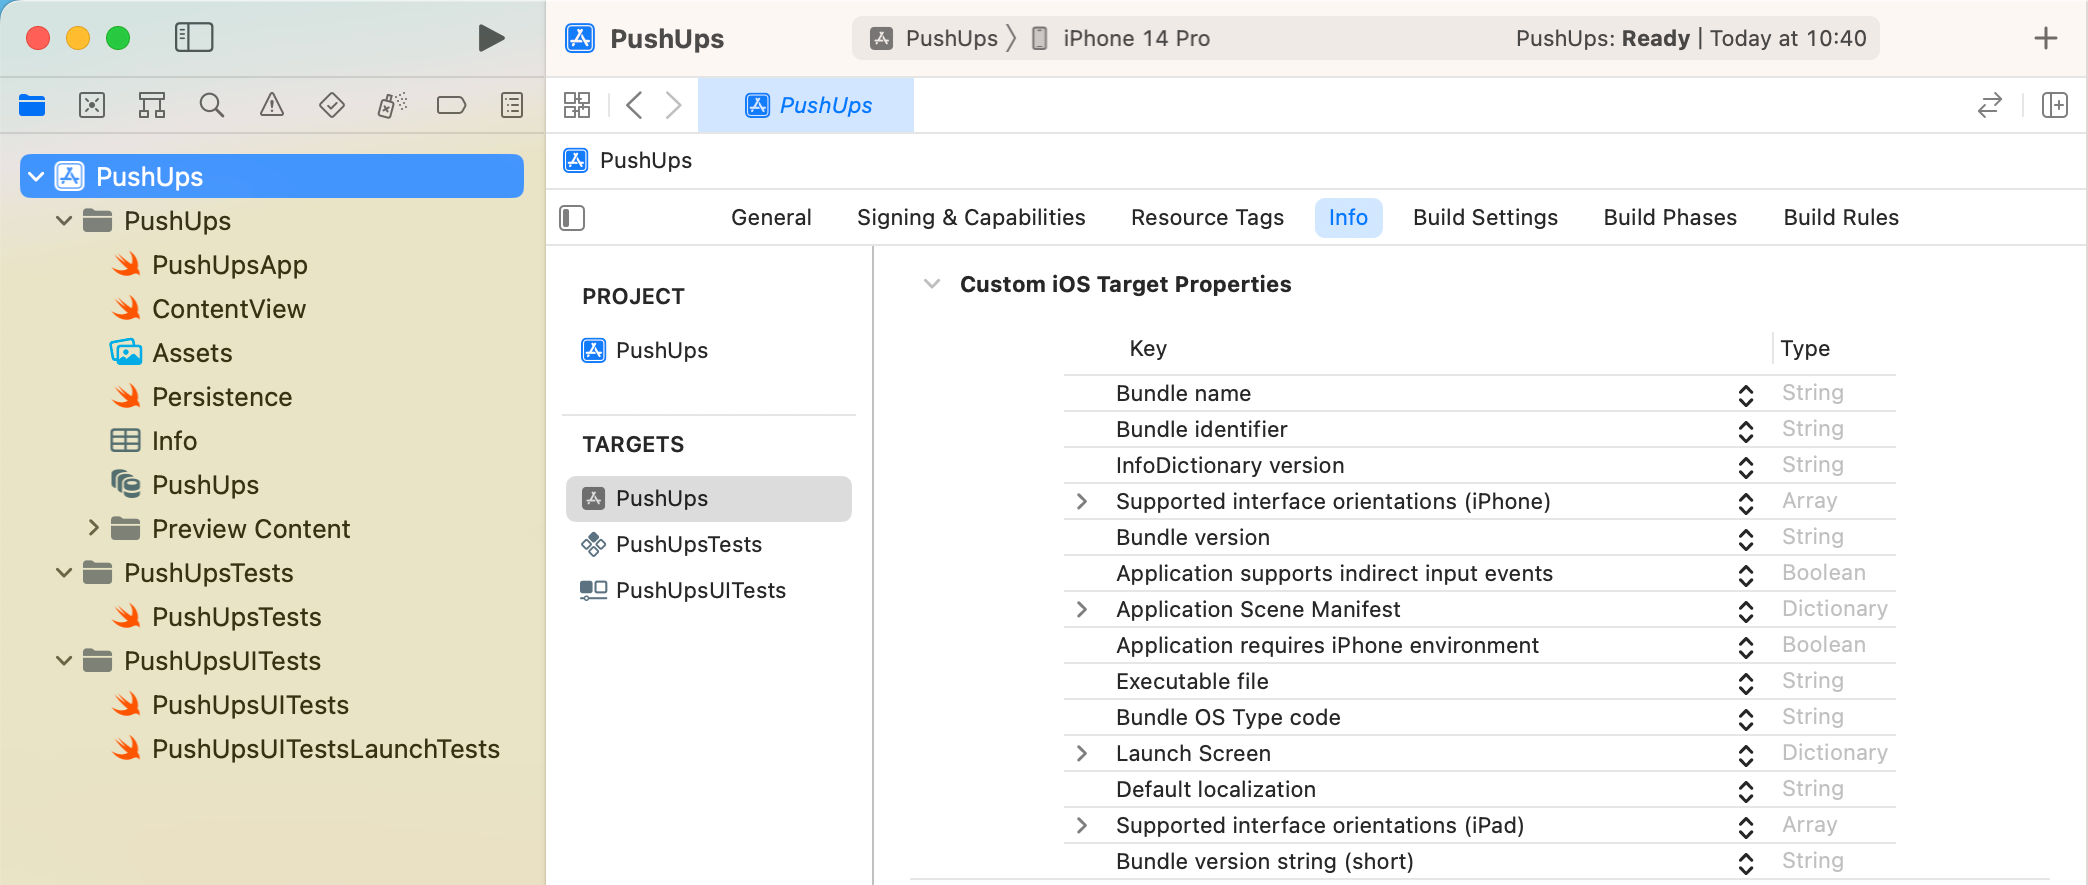
Privacy - Camera Usage Description | "We use your camera to <USE CASE>"
Add this to your app's info.plist or if a newer project under 'Info' tab on your project settings:

Add Camera Permissions Check To Main App
Next, you have to explicitly request access to the camera, which will provide the Apple standard camera permission prompt. This is only a demo implementation, as you'd typically want to give the user an idea of what your app does first and why camera permissions help them.
import SwiftUI
import AVFoundation

@main
struct DemoApp: App {
    var body: some Scene {
        WindowGroup {
            DemoAppView()
        }
    }
}
struct DemoAppView: View {
    @State var cameraPermissionGranted = false
    var body: some View {
        GeometryReader { geometry in
            if cameraPermissionGranted {
                QuickPoseBasicView()
            }
        }.onAppear {
            AVCaptureDevice.requestAccess(for: .video) { accessGranted in
                DispatchQueue.main.async {
                    self.cameraPermissionGranted = accessGranted
                }
            }
        }
    }
}
Attach SDK to Views
This is our standard boilerplate implentation providing:
- A fullscreen camera display.
- An overlay showing the AI user's landmarks.
- Minimal reloading of SwiftUI view's for high performance
- Orientation changes for Portrait or Landscape.
- Sensible memory releasing when the view is no longer visible.
import SwiftUI
import QuickPoseCore
import QuickPoseSwiftUI

struct QuickPoseBasicView: View {
    private var quickPose = QuickPose(sdkKey: "YOUR SDK KEY HERE") // register for your free key at dev.quickpose.ai
    @State private var overlayImage: UIImage?
    var body: some View {
        GeometryReader { geometry in
            ZStack(alignment: .top) {
                QuickPoseCameraView(useFrontCamera: true, delegate: quickPose)
                QuickPoseOverlayView(overlayImage: $overlayImage)
            }
            .frame(width: geometry.safeAreaInsets.leading + geometry.size.width + geometry.safeAreaInsets.trailing)
            .edgesIgnoringSafeArea(.all)
            .onAppear {
                quickPose.start(features: [.showPoints()], onFrame: { status, image, features,  feedback, landmarks in
                    if case .success(_,_) = status {
                        overlayImage = image
                    } else {
                        overlayImage = nil
                    }
                })
            }.onDisappear {
                quickPose.stop()
            }
        }
    }
}
Extracting Results
Next step is to extract results from QuickPose to use in your app. Adapt the code above, so that the feature returns a result, such as range of motion.
@State private var feature: QuickPose.Feature = .rangeOfMotion(.neck(clockwiseDirection: true))
To see the captured result, store a string of the value as a state variable.
@State private var featureText: String? = nil
And attach an overlay to our view displaying the string if set
ZStack(alignment: .top) {
    QuickPoseCameraView(useFrontCamera: true, delegate: quickPose)
    QuickPoseOverlayView(overlayImage: $overlayImage)
}
.overlay(alignment: .bottom) {
    if let featureText = featureText {
        Text("Captured result \(featureText)")
            .font(.system(size: 26, weight: .semibold)).foregroundColor(.white)
    }
}
And populate the feature text, by indexing the feature from the feature results dictionary.
quickPose.start(features: [feature], onFrame: { status, image, features,  feedback, landmarks in
    if case .success(_, _) = status {
        overlayImage = image

        if let features = features[feature]  {
            featureText = features.stringValue
        } else {
            featureText = nil
        }
    }
})